
Before you release your mobile app, you must test it.
Despite your developers’ skillset, they might not have considered some capabilities (e.g., load handling, memory usage, etc.), and there’s always a chance software bugs have crept in.
However, testing will uncover these drawbacks and help prepare your mobile app for release.
That being said, the first step to high-quality testing is a QA plan: a detailed, high-level document outlining the complete testing process, covering every possible aspect.
If you’re unsure what to include in your QA plan, keep reading. We’ll reveal what makes a great mobile app QA plan.
Table of Contents
General information
The very first section of a mobile app QA plan should introduce the reader to the document.
This is best done by listing some general information—that way, you’ll provide a brief overview of the QA plan’s objective and methodology.
The visual below depicts the essential general pieces of information:
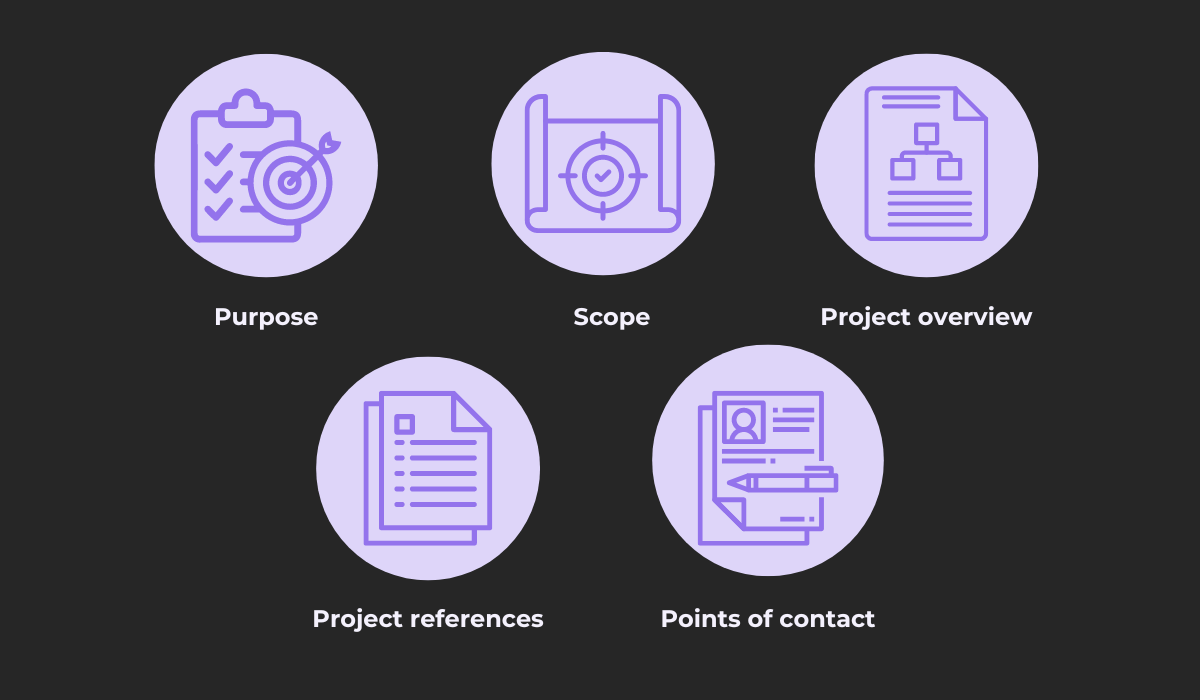
The most crucial section is the document’s purpose: information on why your team composed the QA plan and what you hope to achieve with it.
The scope is also crucial, as it identifies what exactly is included in the mobile QA process.
Next comes the project-related details: a short summary of the project in question and an accompanying reference list.

Get unreal data to fix real issues in your app & web.
Finally, you should always include points of contact in case anyone has any inquiries regarding the mobile QA procedure.
These five information sections will be a superb introduction to your company’s QA process, and all readers should immediately understand how to execute QA.
For example, consider the following screenshot:
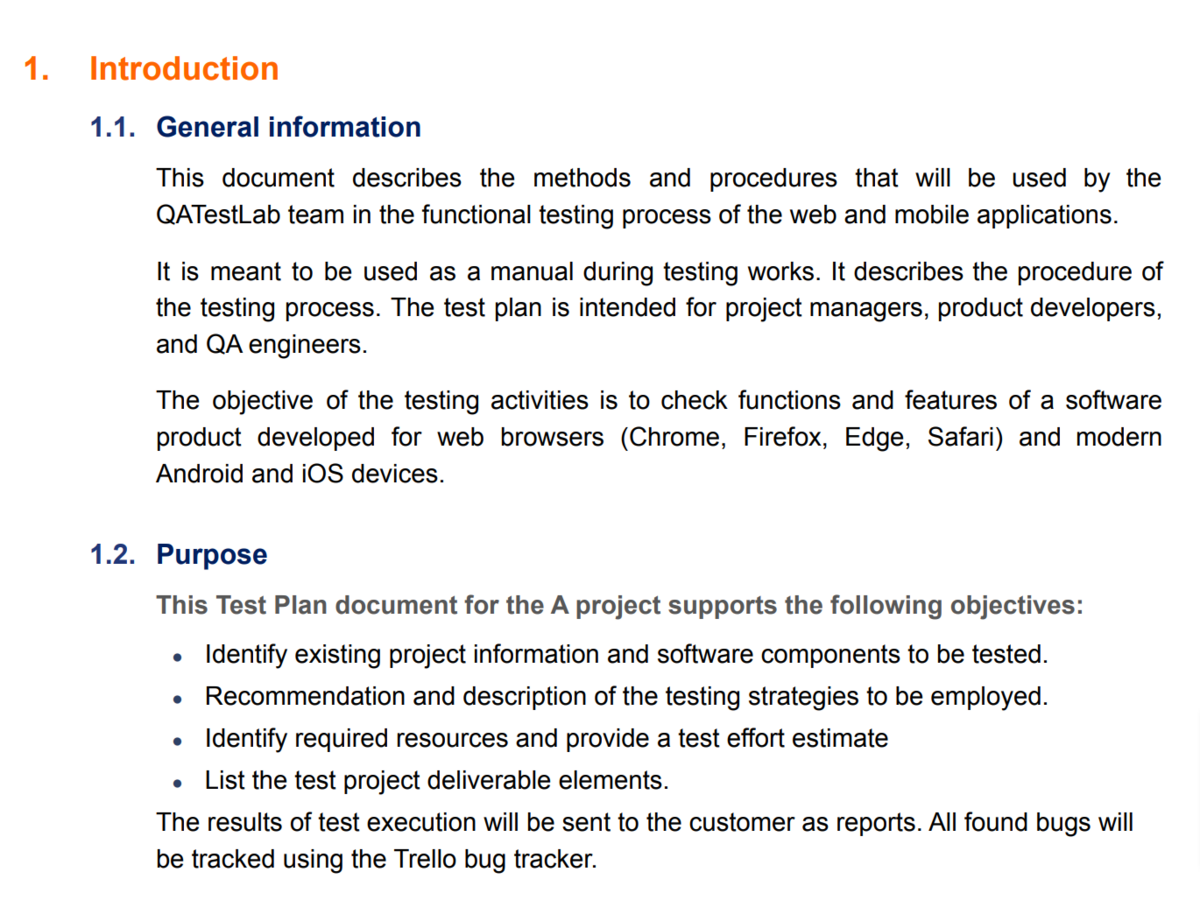
This sample QA plan outlines some general information and immediately defines the document’s purpose.
Consequently, all readers know what to expect from the rest of the document and when to consult the QA plan.
With such general information positioned at the text’s beginning, you’ll create the perfect introduction to your QA plan.
Organizational structure
A dedicated QA team carries out QA processes. However, which QA employee performs which task?
Who’s in charge of usability testing, and who conducts ad hoc testing? Who handles the defect reporting?
You should find the answers in the mobile app QA plan.
The document should contain all details regarding the QA team’s organizational structure, listing each individual’s role and responsibilities.
Broadly speaking, there are three positions in every QA team.
Here they are:
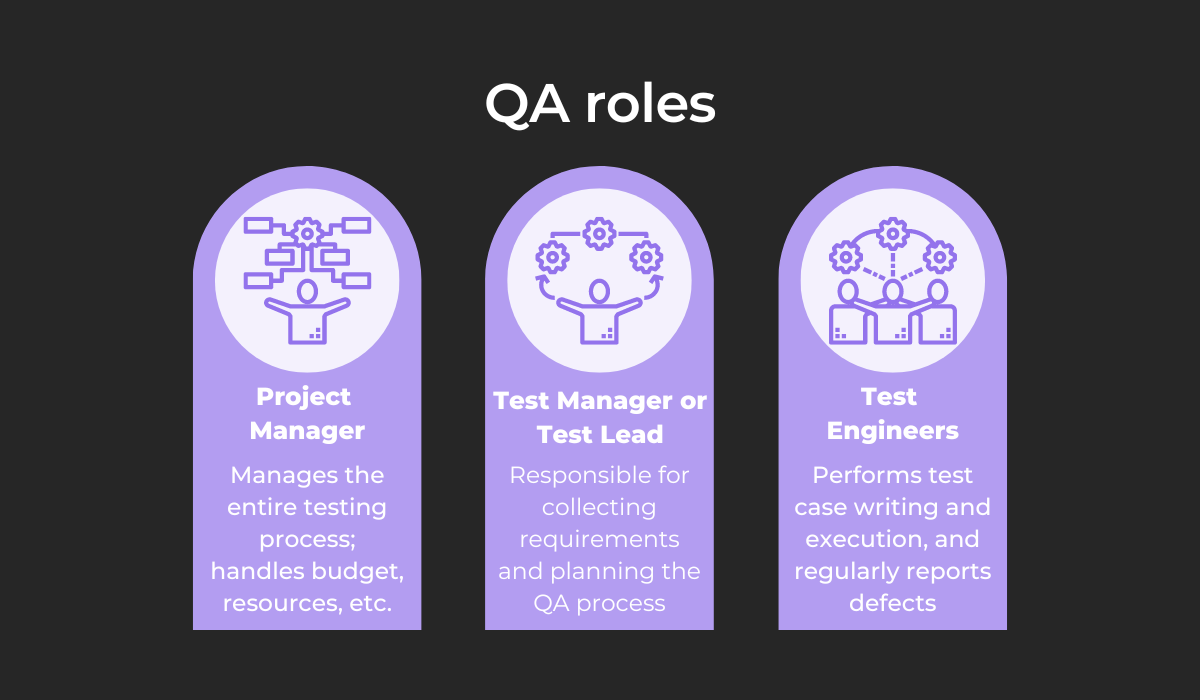
The project manager manages the complete testing process, working with other departments to finalize the budget and timelines, as well as providing necessary resources.
The other managerial role is the test manager or test lead. They’re responsible for internal QA processes, such as test monitoring, project reporting, and collecting requirements.
Finally, the most numerous are the test engineers—individuals writing and executing tests and reporting bugs.
Ideally, every mobile app QA plan should outline each position’s responsibilities.
The image below is a good example:
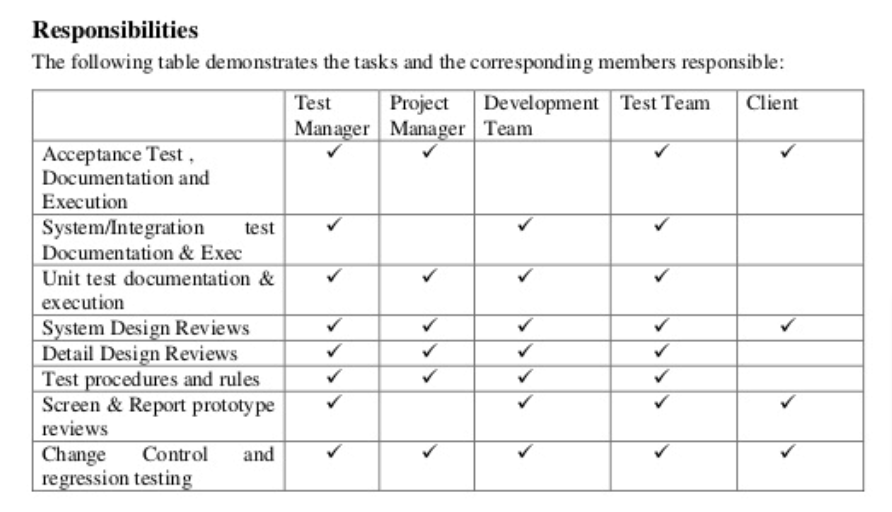
This table is an expanded version of a typical QA role and responsibility overview, as it also includes the development team and client.
Nonetheless, it depicts each QA employee’s exact role, and everyone should know what’s expected of them.
With such a table, your mobile app QA plan will clearly communicate your QA process’s exact organizational structure.
System documentation
Every QA procedure requires documentation. Imagine you discover a software bug—the only way to correct it is by writing a bug report.
Similarly, you need test cases to guide you through conducting tests.
Consequently, to ensure productive QA activities, it’s necessary to utilize QA system documentation.
And a well-written mobile app QA plan should outline exactly which documents will be included.
Such documentation is generally divided into four phases, shown in the visual below:
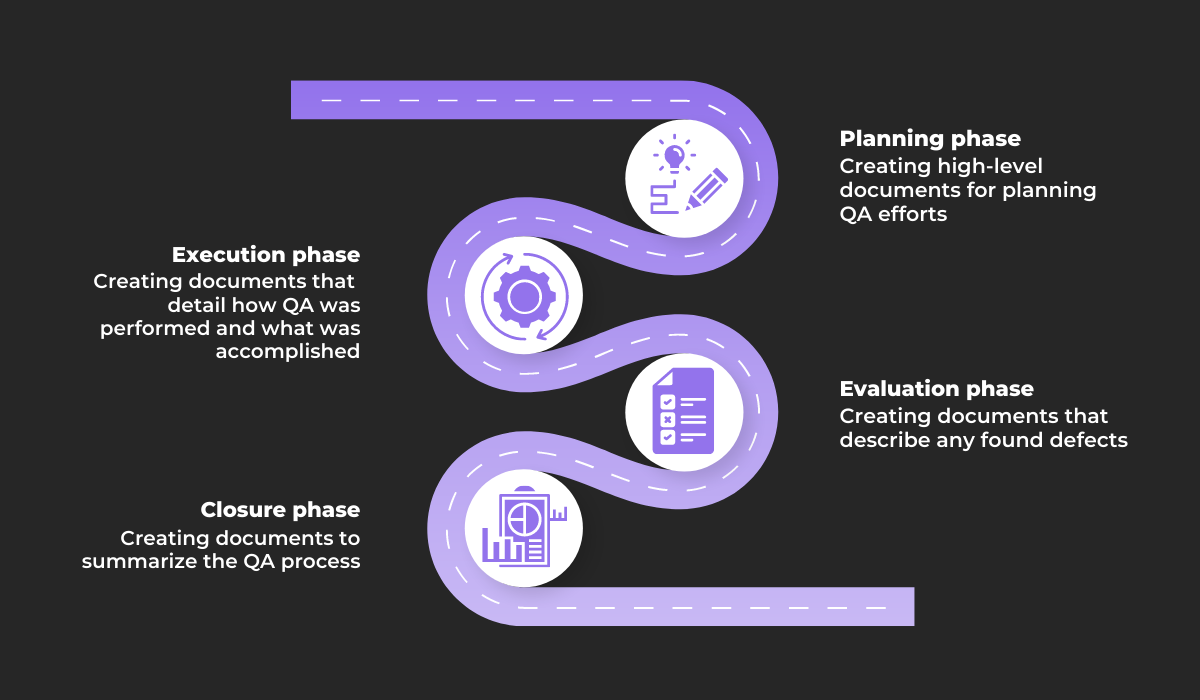
The initial phase encompasses planning efforts. This is typically when the QA plan itself is created, along with a test strategy and the software requirements specification.
Next comes the execution phase, where testers write documents to complement their testing—for example, test cases and test scenarios.
Afterward is the evaluation phase, when QA employees log bug reports upon finding any defects.
Finally, the closure phase is when testers compose a comprehensive testing summary report and document all testing results.
For an example of such listed documentation, look at this QA plan:

The above screenshot is an excerpt from an MSE (micro and small enterprise) project detailing the system documentation of a QA plan.
The author included several specification documents as essential supporting texts for their QA procedure. Clearly, this documentation is necessary for an adequate QA process.
List of tools
QA employees don’t have to perform all their tasks manually.
Nowadays, there are countless tools to facilitate QA activities, and you can easily find tools for bug tracking, bug reporting, and automated testing.
Given the proliferation of such tools, it’s worth composing a succinct list of all your available tools. Therefore, most mobile app QA plans also include a catalog of used resources.
Here’s an example:

There’s a clear overview of available tools, even those not directly related to QA (e.g., the screenshot tool Techsmith).
However, the above list also needs a mobile testing automation solution. This is also worth having (and documenting), as it significantly accelerates testing efforts.
One of the most popular mobile testing automation tools is Appium, a cross-platform solution for iOS and Android.
Here’s how it works:
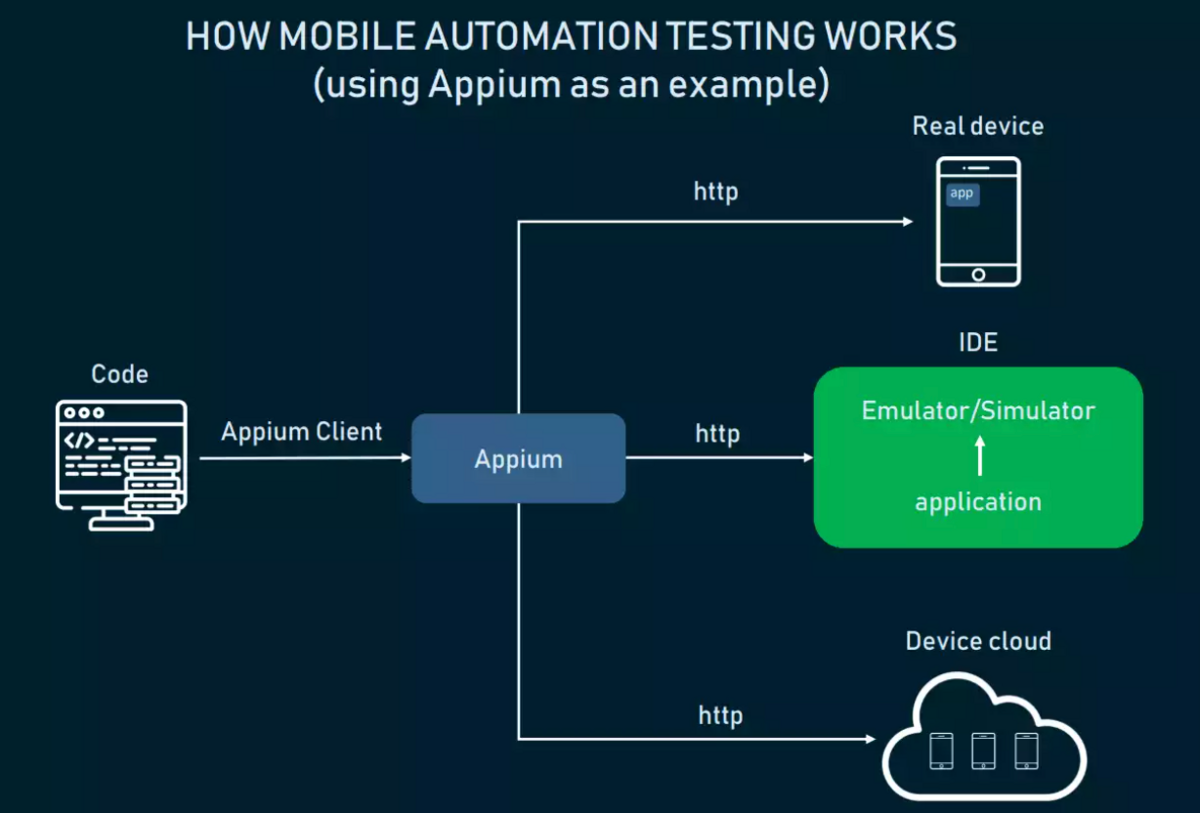
The user inputs commands, and the platform’s server converts them into a format that the native test framework will accept.
For iOS, that framework is XCUITest, whereas Android’s is UIAutomator. In other words, the commands are executed in the tested application inside an emulator or simulator.
It’s a good idea to introduce such an automation tool in the QA plan, as testers should then get a head start on their automation testing.
Testing methodologies
There’s no one set way to test a mobile app. Such software is complex and must be tested from several different angles. It’s not enough just to trial its individual functions.
What if the app crashes under a heavy load? What if it’s nonintuitive, and users struggle to use it?
As such, there are multiple ways to approach mobile app testing. Given all the possible combinations, it’s best to outline your testing methodology in the QA plan.
That way, all of your testers will know your testing strategy.
Generally speaking, here are some possible testing types:
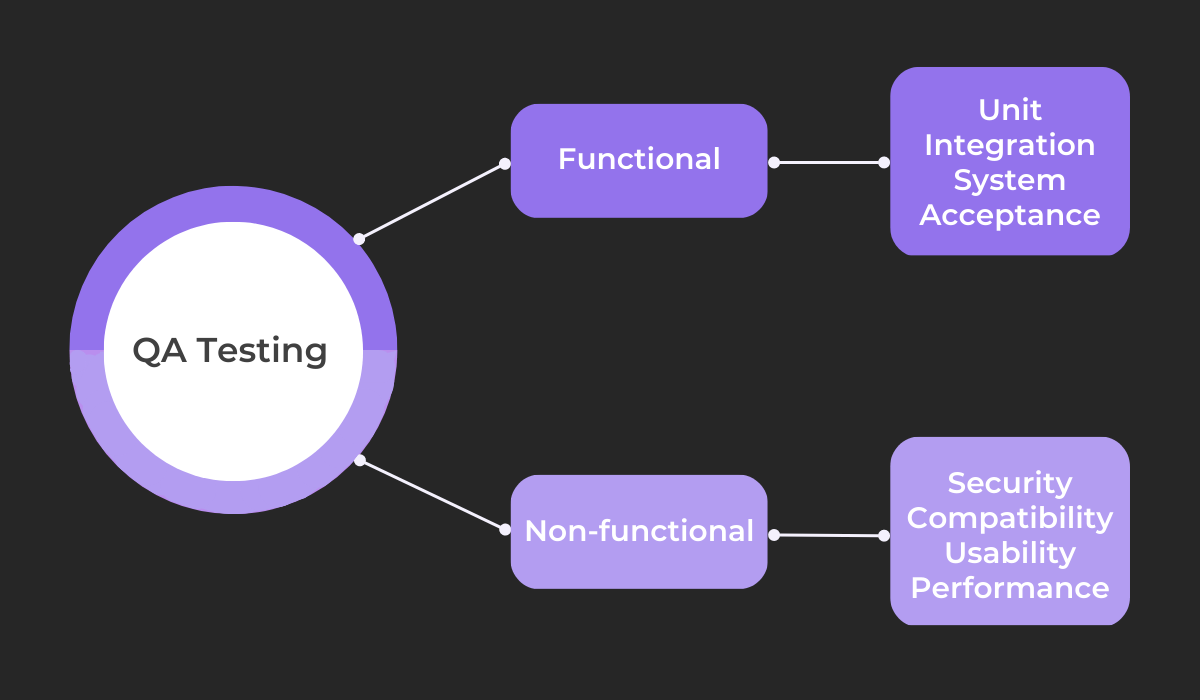
There are quite a few variants to take into consideration. Testing is split into functional and non-functional testing, each containing its own sub-categories.
Carefully evaluate all your options, and once you have a definite strategy in place, document the entire testing methodology.
Here’s an example of how Lasting Dynamics documented its testing approach:
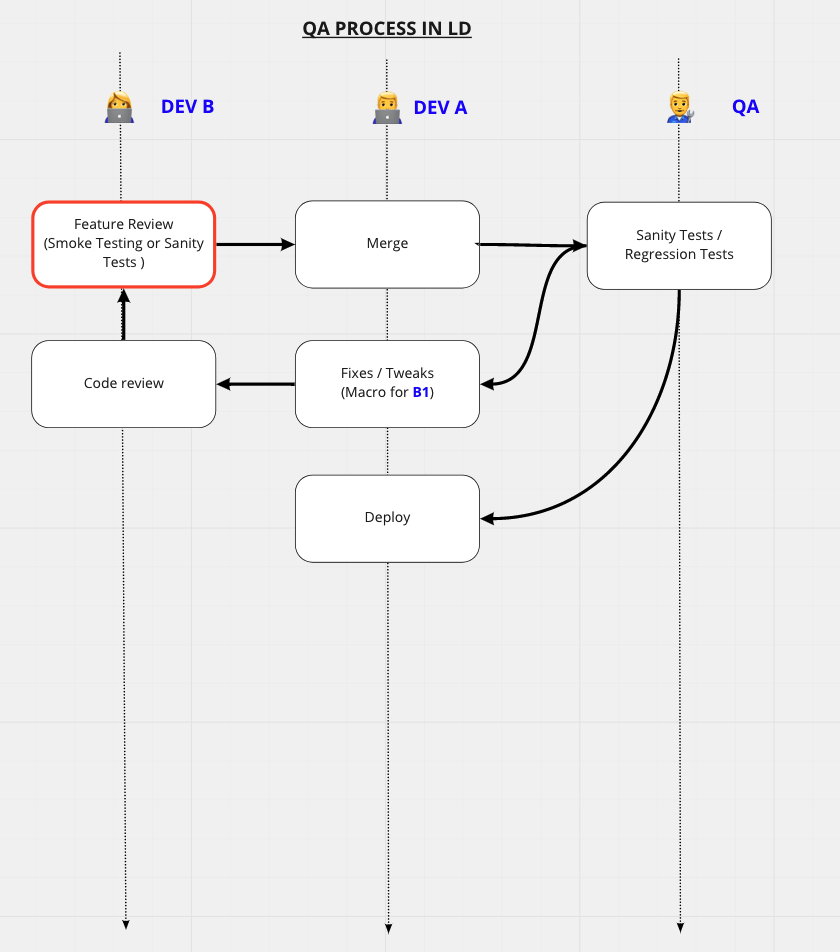
The entire QA process is clearly displayed. Testing starts with smoke and sanity testing (sub-types of performance testing), code is merged, and then it’s regression testing’s turn.
With this diagram, testers know precisely how to conduct mobile app testing: which steps to take, who takes them, and when to take them.
The methodology is clear-cut and understandable, and there shouldn’t be any ambiguity regarding testing approaches.
Problem reporting
Unfortunately, some bugs are bound to creep into your software. However, the QA team can minimize their damage via problem reporting.
Problem (or bug) reporting is documenting a software defect. QA employees log the error, provide as much detail as possible, and help the developers debug.
However, policies and procedures should be in place for this practice to be effective.
That way, you’ll create bug reporting standards, and each report should follow the same structure and logic.
Consequently, a good mobile app QA plan should include such guidelines.
Here’s an example of how that might look:
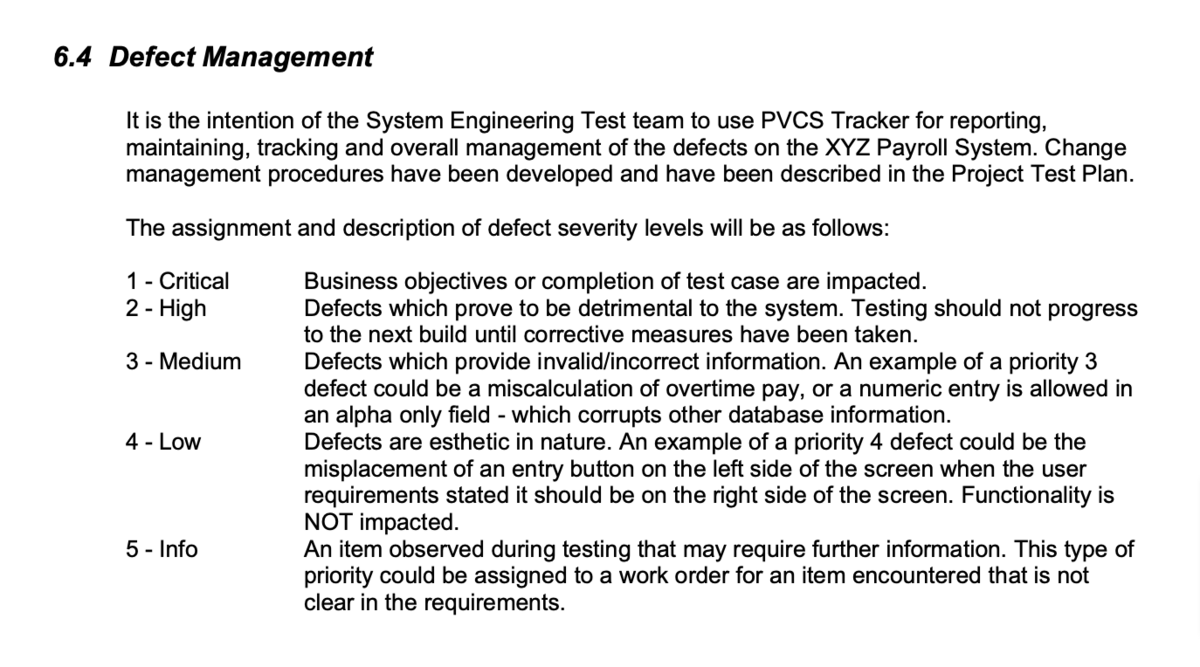
With this explanation, each QA employee will follow the same logic when assigning defect severity. This is hugely helpful, as your testers won’t lose time wondering what severity to note.
In fact, bug reporting is often a lengthy process, as the documents must be comprehensive and detailed.
To streamline this procedure, it’s worth investing in a bug reporting tool such as Shake.
With this resource, simply shake your device, and an exhaustive bug report will immediately be sent to the developers.
Here’s a sample bug report:
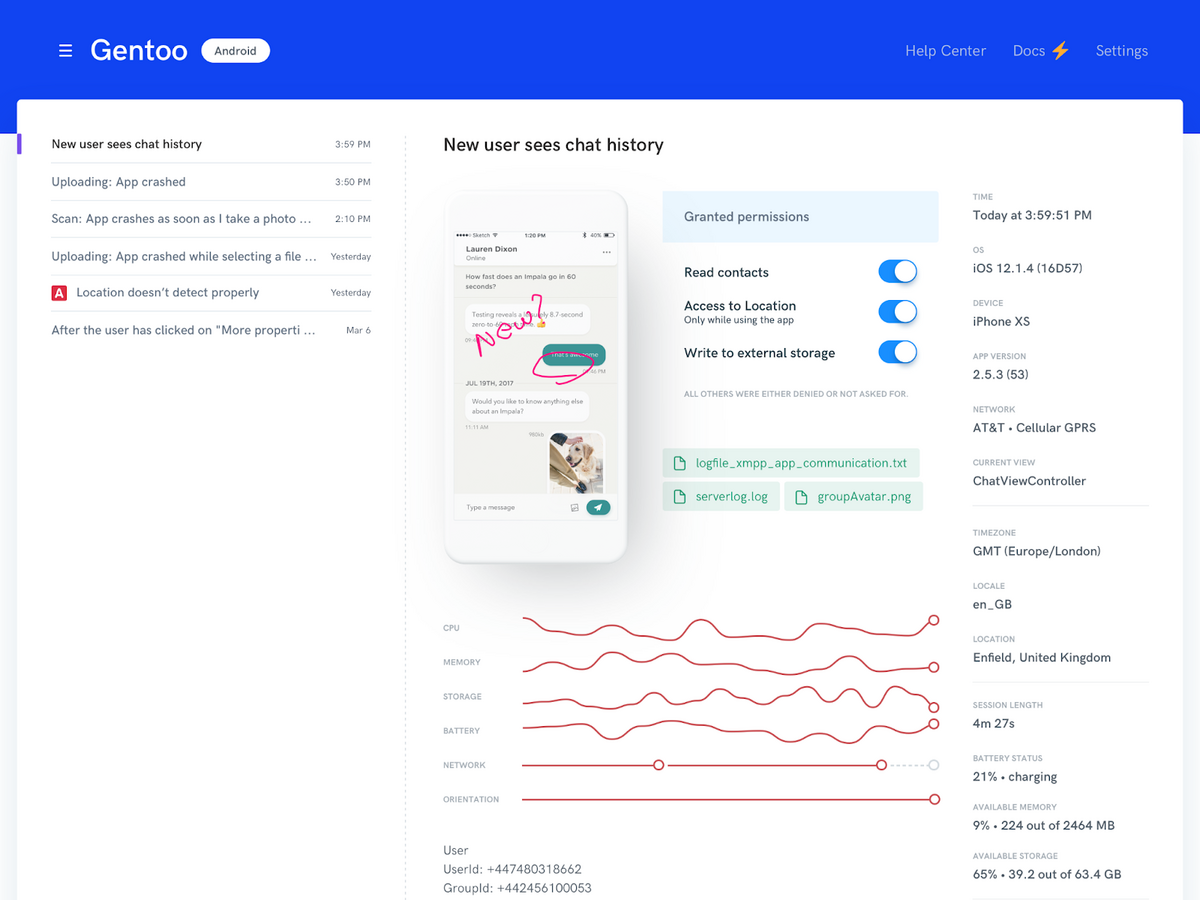
The document contains everything developers will need: environment details, logs, screenshots and screen recordings, and more.
With this tool, your testers can submit bug reports automatically, significantly accelerating their workflows.
Risk management
Software bugs aren’t the only components that can go wrong in mobile app development. There are plenty of possible issues that might impede the project—even in the QA process itself.
These dangers are commonly referred to as risks and are defined as follows:
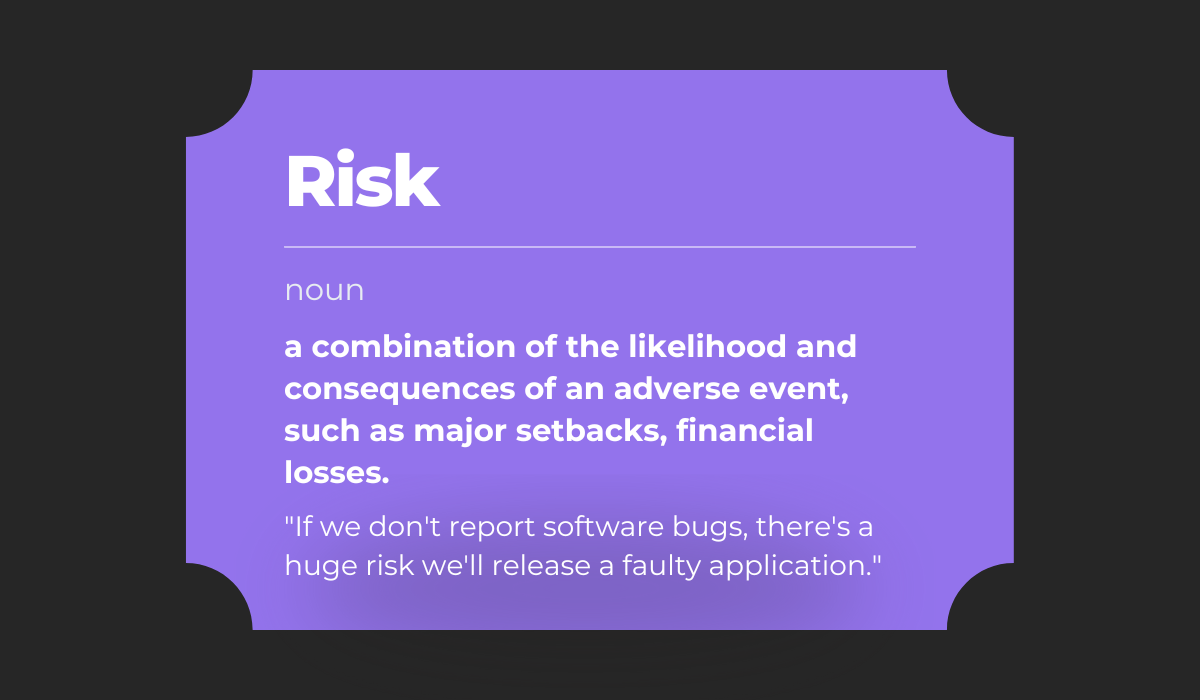
Risks shouldn’t be unaddressed, as disregarding them is only likely to set the project back further.
Instead, it’s best to include a risk management strategy in your mobile app QA plan and anticipate the possible problems you’ll run into.
Furthermore, a risk management strategy should also include definitive approaches to combating these risks.
That way, even if there is any unexpected setback, you and your testers will immediately know how to mitigate the issue and minimize the damage.
For example, take a look at this risk management excerpt:
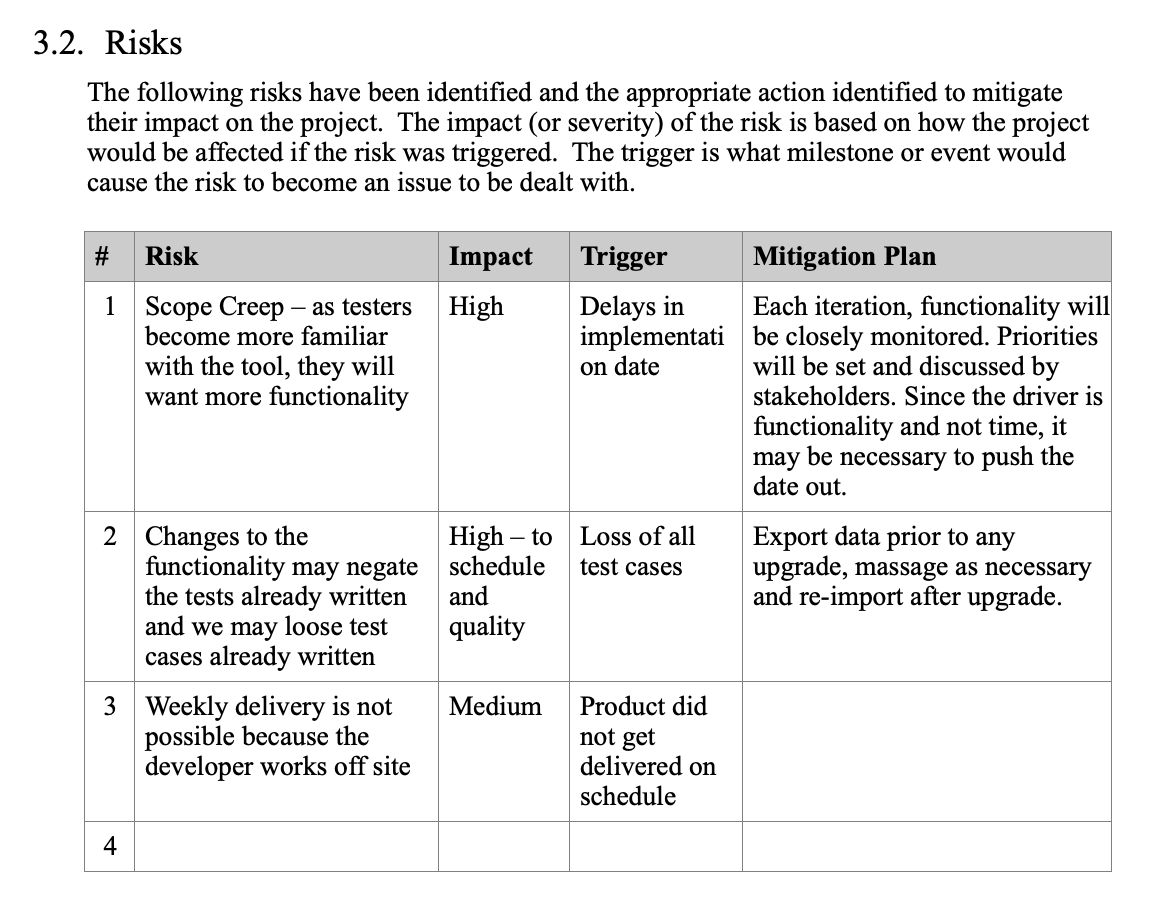
The table outlines several possible risks and also assigns them an impact level.
This metric is similar to severity and priority in bug reports, as it indicates what level of damage the risk might cause.
In addition, each risk is also described with a trigger: an event that will bring about the risk’s negative consequences.
However, the most helpful information is the mitigation plan—guidelines on controlling the risk and minimizing the damage as much as possible.
With that information, you can contain any probable liabilities.

Review process
Quality Assurance is a department chiefly concerned with evaluation. As such it also includes an internal review process.
It isn’t enough to write test cases and immediately start testing—those test cases should be assessed to ensure they’re viable tests contributing towards software quality.
The mobile app QA plan should also include this internal review process. That way, you’ll create a systematic approach to ensuring a first-rate QA process.
These are the five most essential reviews:
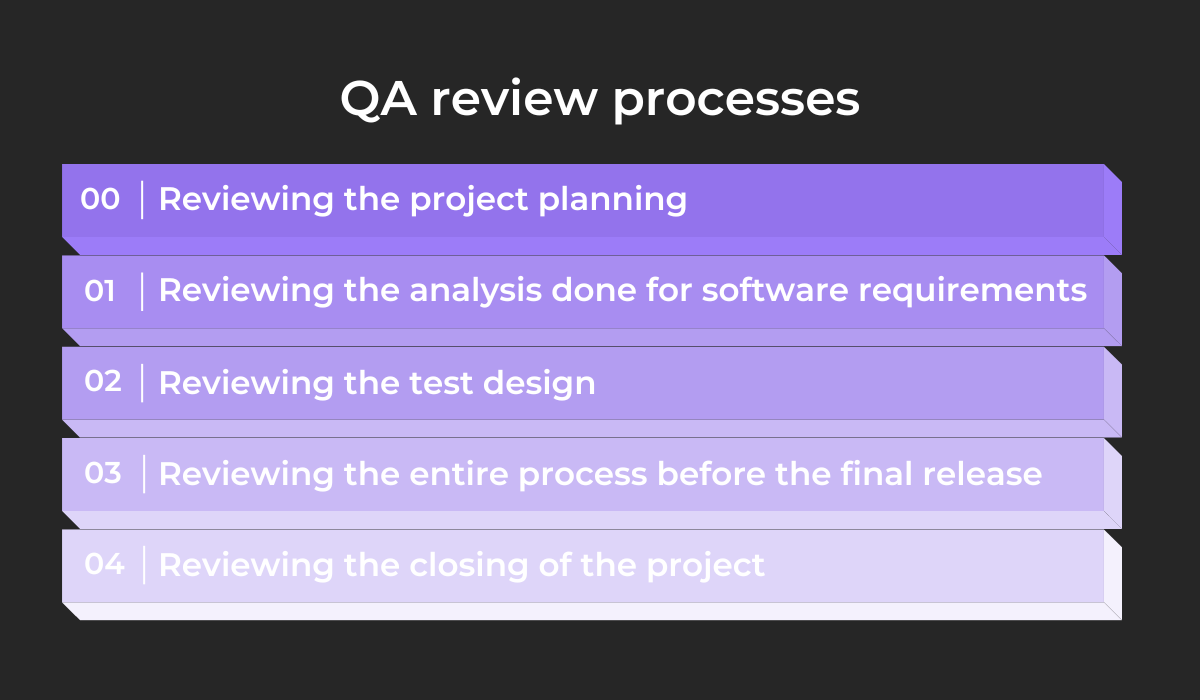
The initial step is to review the mobile app QA plan itself and evaluate if it’s detailed enough.
After that come several other document reviews: the software requirements specification and the test designs. If these two texts aren’t well-composed, the entire QA effort could fall through.
Near the end of the project come two other reviews. The first reports all the testing efforts, whereas the last summarizes the final general, overarching approach.
For a better understanding of the exact timeline, look at the illustration below:
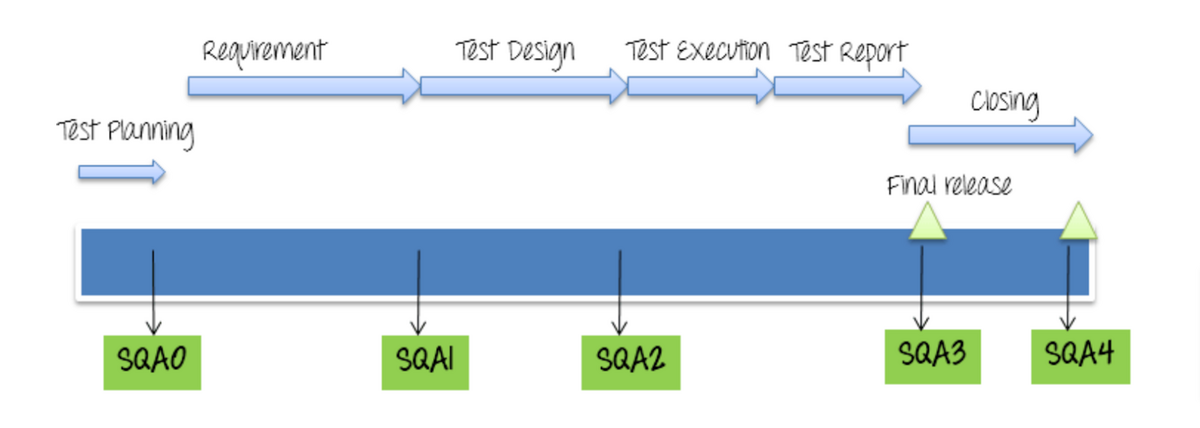
SQA stands for software quality assurance, and the corresponding numbers are indicated in the previous visual.
As you can see, the first step occurs before testing begins, and the final two are conducted with the software release.
Outlining the structured review process in your QA plan should facilitate your QA efforts and will ensure a foolproof QA strategy.
Conclusion
A good mobile app QA plan is the first step to a superb testing strategy.
This document is a high-level overview of everything related to the testing process and is invaluable for your testers.
With this document, your employees can continuously refer to the QA plan if they have any questions.
This text covers everything from testing methodologies to organizational structure, so they should find the answers they need.
Without a high-quality mobile app QA plan, you risk subpar testing and, by extension, faulty software.
For that reason alone, ensure your mobile app QA plan contains all the necessary sections.
