
Quality assurance (QA) is one of mobile app development’s most important phases for obvious reasons.
You can have the most stunningly designed app in the world, but if it doesn’t work properly, your app will be dead in the water.
However, contrary to popular belief, QA isn’t simply about making sure that code and design are free of bugs and working correctly.
It’s also about creating efficient workflows so testing can become easier to manage not only in the current project but also repeatedly later on.
So let’s examine the elements that make quality workflows, what it takes to create one, and how you can set measuring processes to ensure that it’s yielding the best results.
Table of Contents
Plan your QA process
Planning is important in any endeavor because it helps keep everyone organized and working toward the same goal.
The QA process is no different.
That’s why your first step should be to determine the test policy, test strategy, and test plan, the essential documents that will be the building blocks of your QA workflow.
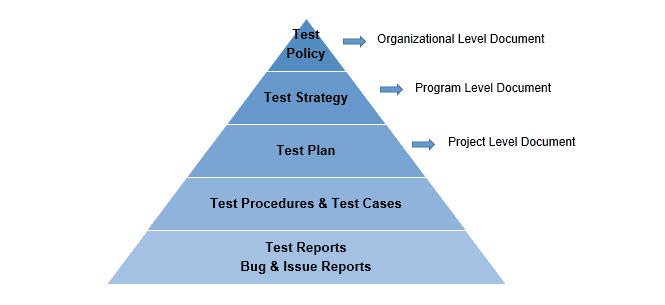
You can see from the image above that test policy is an organizational-level document that sets the ground rules for how testing should be performed.
As such, it encompasses a number of different aspects, including the rules that govern the testing, standards for what is expected during testing, guidelines for how to conduct tests, and various principles behind these processes.
Because it’s more general in nature, it’s usually the responsibility of senior managers to draft and approve it.
That means that you’ll probably have to write it once and then revise and update it annually.
Complementing your policy is your test strategy which describes in greater detail the procedures and approaches to testing.
The image below offers a glimpse of what such a strategy might entail.
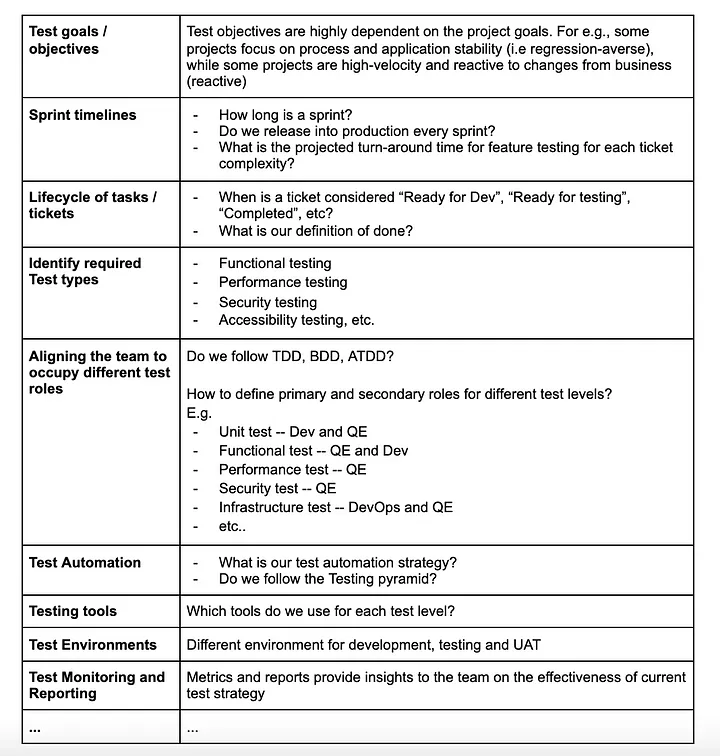
This is where you’ll have to roll up your sleeves and get into the nitty and gritty of your testing objectives, types, tools, and methods that’ll be used on specific projects.
While test strategy is typically intended for large projects, it’s present in smaller projects as well, where it’s usually integrated into the test plan.

Get unreal data to fix real issues in your app & web.
This is something to keep in mind so that you don’t feel obliged to write extensive strategy documentation for every project.
That brings us to the beating heart of every testing effort—the test plan.
This is where you’ll have to describe the intricate details of how the app is going to be tested, outline who will perform the testing, decide what activities will be employed, and identify risks that can jeopardize testing efforts.
The picture below nicely illustrates what attributes you should keep in mind while creating your own test plan.
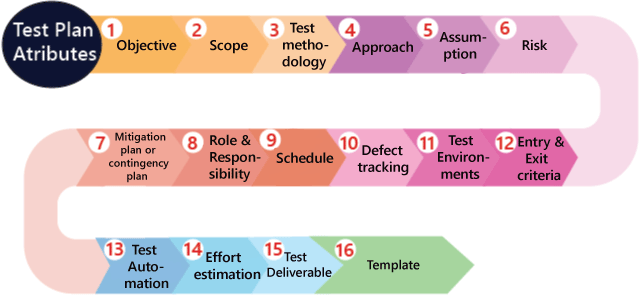
In this phase, try to cover all these attributes and every other angle you can think of so you can eliminate as much of the margin for error as possible.
But don’t forget, a test plan is a living and breathing document, meaning it must be reviewed and updated regularly, especially as the project evolves.
To sum up, all three components of planning documentation will provide you with a foundation and support for all your QA activities.
So, before conducting actual tests, you should make sure that they’re in place.
Choose a person responsible for QA reviews
Once the planning phase is complete, the crucial next step is to assign someone who will conduct QA reviews.
This is not a minor issue because the person you appoint will be vital in ensuring that the app you’re developing is performing as expected.
Therefore, to make the right choice, you should seek out a seasoned QA specialist who has a strong understanding of testing requirements and is trained to detect even the most elusive of bugs in the app.
Here are some additional traits you should pay special attention to:

But why stop at just one person? If you want to ensure that the app is truly top-notch, consider hiring more than one QA reviewer.
With more eyes on your app, you’ll gain different viewpoints on its flaws and vulnerabilities, which will lead to a more well-rounded and polished final product.
Of course, not every company has the means and resources to hire dedicated QA reviewers, especially if it’s smaller in size or just starting out like a startup.
Bobby King, an author at the Usersnap blog, described in his article “How to Design a Quality Assurance Workflow” how they dealt with the same issue in their company:
If you’re a small agency, hiring a QA specialist is not always possible. Our own company only created the role in the past year, as we transitioned from two dozen to over 50 employees. You can still keep the principle of ‘fresh eyes’ in a smaller organization by having developers or team leaders check other developers’ work.
As you can see, developers who aren’t necessarily specialized in QA can also be effective QA reviewers.
What’s important is that they’re detail-oriented, know how to spot bugs in the apps, and can communicate their findings well.
That being said, choosing wisely when it comes to hiring a person responsible for QA reviews should be high on your list of priorities.
After all, the person or people who fulfill this role can have a significant impact on how well your app performs and whether or not users deem it acceptable.
And that is something worth considering.

Prepare a QA checklist
With documentation in place and an expert on board, it’s time to create a QA checklist to make sure everything goes off without a hitch.
Checklists are records that include every element, feature, and function of the app that needs to be tested to ensure that no important steps are missed during the testing phase.
We’ve published an entire article devoted especially to checklists in which you can find as many as 87 items that need to be checked when testing apps.
The image below represents just one portion of it that can be used during signup:
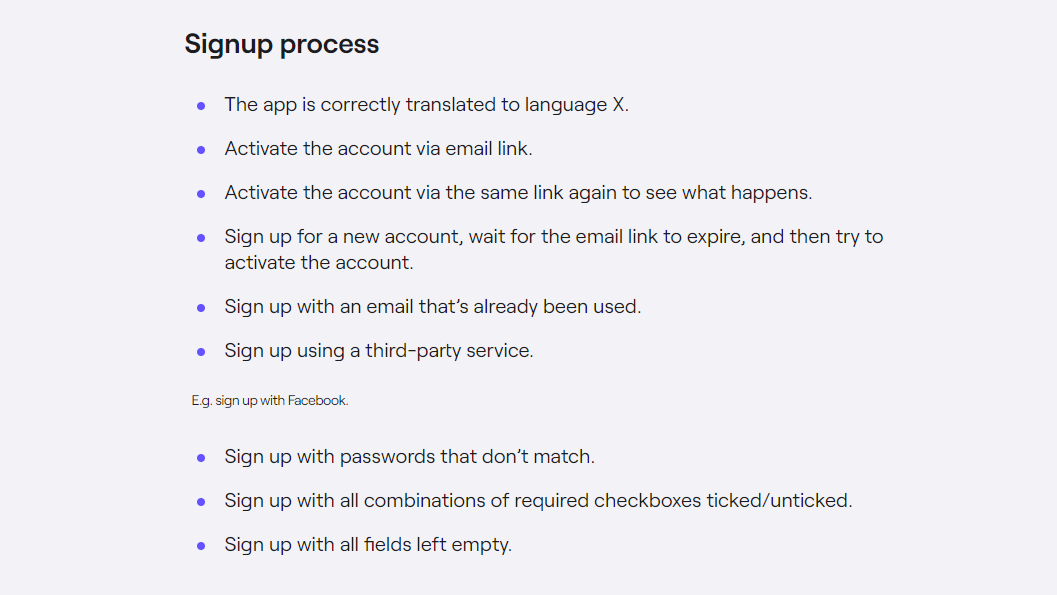
From activating the email via link to signing up with all fields left empty, this checklist covers every possible signup scenario, leaving nothing to chance.
So, if you want your testing to be truly successful, you should also create similar checklists for your own mobile app testing projects.
For that purpose, you can use our article as a base, or consult pages such as Google Play and Android Developers (in the picture below) that give advice for troubleshooting and publishing apps.
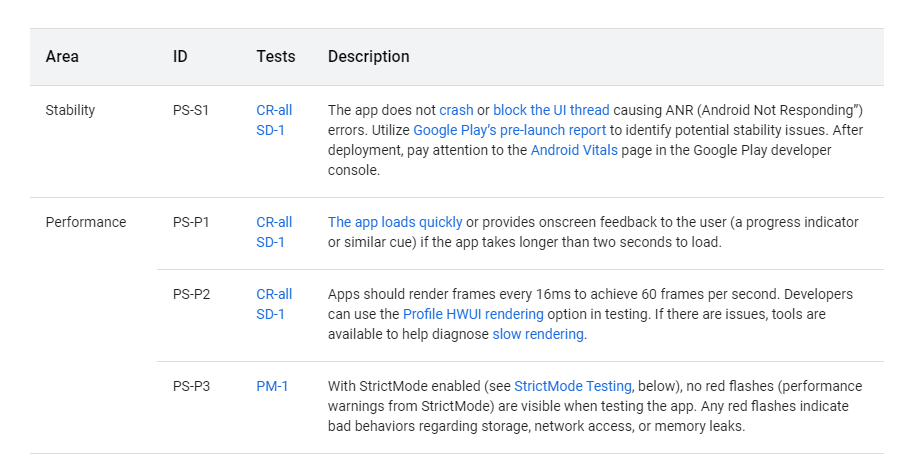
Although they’re not QA checklists per se, they offer a good starting point for creating your own.
Additionally, Reddit and Quora can also be excellent resources for information about what to watch out for when testing.
The best way, though, to make your own checklists is by analyzing your testing process and diligently writing down the steps that best work for you.
It may take some time until you collect all the testing items, but the end result will be highly customized checklists that address your specific needs and strengthen your QA team’s performance.
Set up your chosen tools
Next, you should carefully decide which tools would be most appropriate for putting your workflow into action.
The market offers a diverse range of issue-tracking and management tools, with Jira, Trello, and Asana being among some of the popular choices.
For example, Jira is favored among developers and QA specialists because it offers a lot of features and integrations that make workflows more efficient.

As you can see in the picture above, it allows you to manage all your projects, user stories, test cases, and defects in one central location, so you and your team can better organize your QA processes and enjoy more consistent workflows.
What many don’t know is that these tools can also be used for testing purposes, despite not being primarily designed with that intention.
What we mean by that is that they can be integrated with crash and reporting tools, such as our very own Shake, and used for collecting bug reports and other relevant data important for fixing defects in the app.
To give you a concrete illustration, Shake is a lightweight SDK that you can install on any iOS or Android mobile device.
When you encounter a bug in the app, all you have to do is to shake the phone, and the tool will automatically create an elaborate bug report containing numerous environmental information (more than 70 to be exact) including the following:
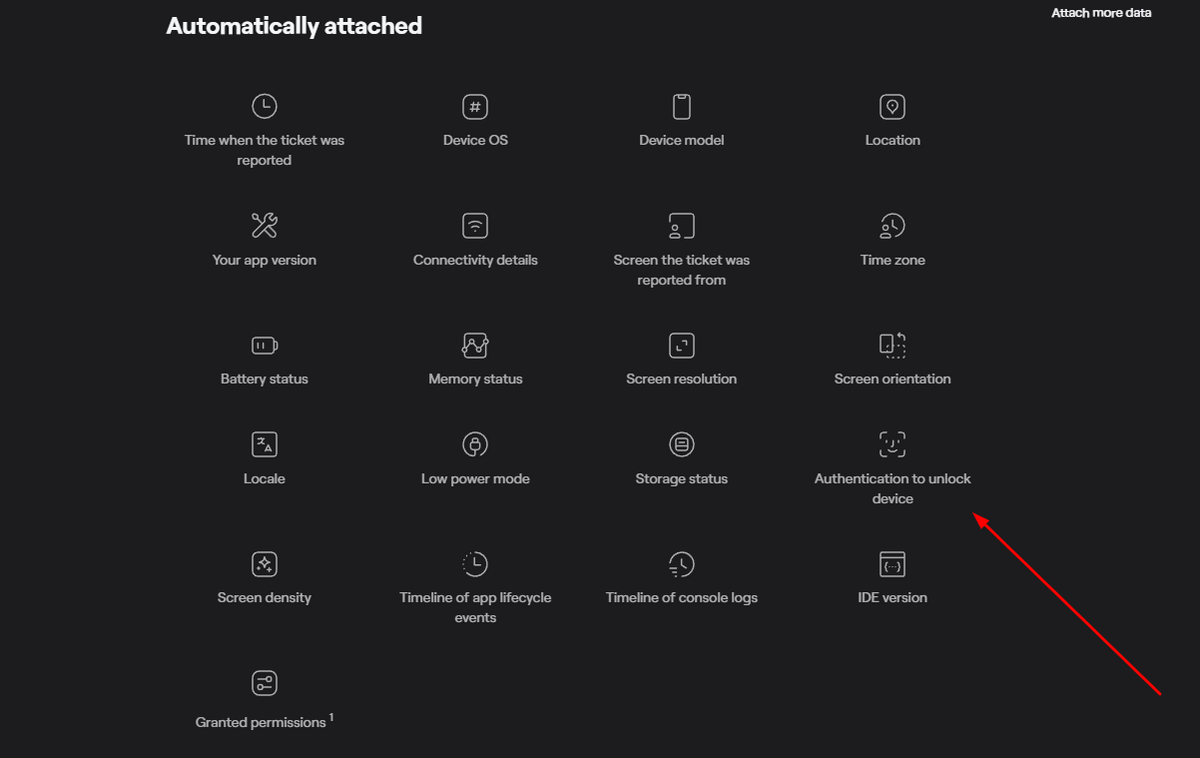
As Shake integrates very well with Jira, this report will then pop up in Jira’s dashboard where all stakeholders, not just developers and QA specialists, can access and inspect it.
Managing and fixing bugs become more efficient thanks to this integration so combining tools such as Jira and Shake can do wonders for streamlining QA workflows.
Therefore, if you want to have a truly structured workflow where all team members understand their responsibilities, and have all the needed documentation and other information at their fingertips, decide on the issue-tracking tools that best integrate with other relevant tools you normally use.
Measure the effectiveness of your QA workflow
Inefficient strategies and inadequate processes can threaten your QA activities and make your workflow a lot less productive.
To avoid this, you should regularly measure the effectiveness of your QA processes and make necessary changes according to your findings.
While there are many QA metrics you can track, we’re going to mention a few of the essential ones which represent a good place to start.
For instance, the metric that measures escaped defects will give you a clear picture of how many bugs managed to sneak past your testing phase and into production, as shown in the below picture.

When you inspect the issue further, you may find that your test suite has become outdated or unreliable and is allowing the bugs to slip through the cracks more often than usual.
And this is the situation that will consequently call for reviewing tests, tweaking their parameters, and changing the workflow accordingly.
On the other hand, test reliability is a metric that will monitor how reliable your test suite is by detecting real bugs and false positives.
Do your tests sometimes fail due to issues with the testing process rather than identifying actual bugs? If so, you should examine the problem and make changes in this area as well.
Additionally, keeping track of the test team is always a good practice as it’ll help you identify how you’re spending time and resources during testing.
For example, you can monitor the following categories:

This will help you to determine how well your team members are executing the test cases they’ve been allocated and spot any defects or bugs that may need to be retested.
Data received by these measurements directly correlates with the performance of your QA team and their tasks and activities, showing you bottlenecks in your QA workflow that may require more attention.
This is just a fraction of the metrics you can utilize to evaluate your QA workflow.
What they all have in common is that they can uncover shortcomings in your testing procedure, as well as your strong points, giving you data-driven insights on how you can improve your workflow.
Conclusion
As you can see, having a good QA assurance workflow shouldn’t be reserved only for large companies that have a lot of resources available.
With the help of quality planning, passionate QA reviewers, comprehensive checklists, the right metrics, and proper tools, anyone can create efficient workflows that’ll make their QA process more structured and organized.
We hope that this article has shed some light on what it takes to design a powerful workflow and that your team will quickly begin to see the benefits of having such a system in place.


