
Recommended
Defect management tools: Top 7 software you can use

In the field of software development, efficiently managing defects both before and after a mobile app is released is pivotal for its success.
While most bugs and other issues are detected and fixed during software development and testing, some defects typically surface only after the app’s release.
In either case, defects need to be reported and managed until resolution.
More precisely, defect reports should enable your dev team to clearly understand what went wrong, while your defect management process should facilitate the effective resolution of the reported issues.
To help you achieve this, we’ve outlined five best practices for successful defect management reporting.
Table of Contents
Using the right defect management tools can streamline the process of reporting, tracking, and resolving defects, making it more efficient, simpler, and faster.
Since we’re talking about software development, it’s safe to assume your organization is already using a range of developer tools, including some for defect management.
In that case, you can use this section as a reminder, or you might find something to fine-tune your defect management process.
Typically, you’ll need several tools to seamlessly cover both defect reporting and defect resolution processes.

Get unreal data to fix real issues in your app & web.
These tools can range from project management and issue tracking software to bug reporting tools, test management solutions, version control systems, and communication platforms.
Expectedly, such solutions also act as a centralized platform for reporting, tracking, and resolving software defects.
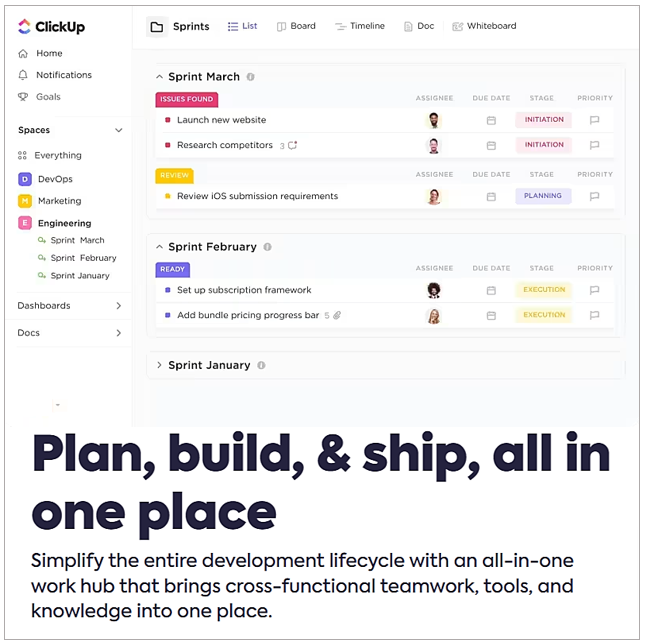
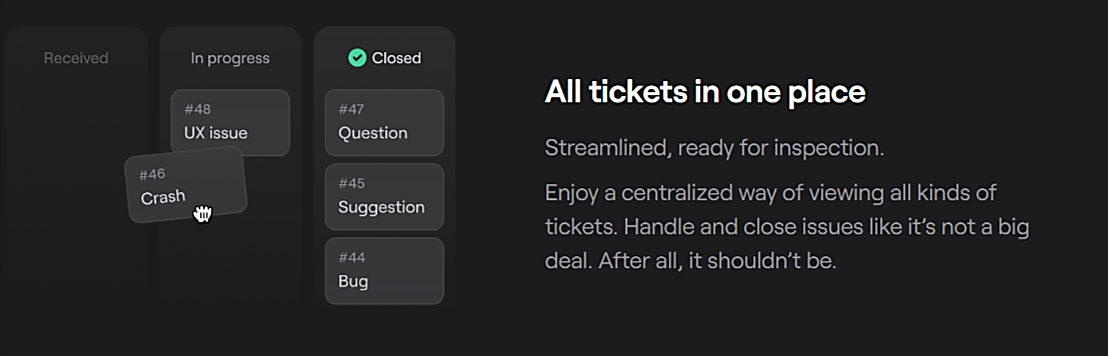
For instance, ClickUp provides bug report templates testers can use to report any kind of issue they encounter while testing the app.

As explained in the visual above, you can use ClickUp to collect defect reports via intake forms and turn them into trackable and prioritized defect resolution tasks.
While such standardized report forms—now even supported by ChatGPT prompts—can help create better defect reports, this still involves a lot of manual work when reporting an issue.
From taking a screenshot, logging into ClickUp (or Jira), opening a new issue, and writing the bug description, to manually entering technical info.
The latter often leads to some crucial technical details being inadvertently left out of the report.
This can be avoided by integrating your issue tracking platform with a bug reporting tool that will automatically capture relevant technical data when a defect occurs.
One such tool is our own Shake.

For starters, Shake can be easily added to your mobile app without affecting its speed and while respecting data protection requirements (GDPR and CCPA).
When a tester encounters a defect, they can just shake their mobile device (or tap an in-app button).
This will prompt Shake to automatically generate a detailed bug report with useful data already attached.
What data, you ask?
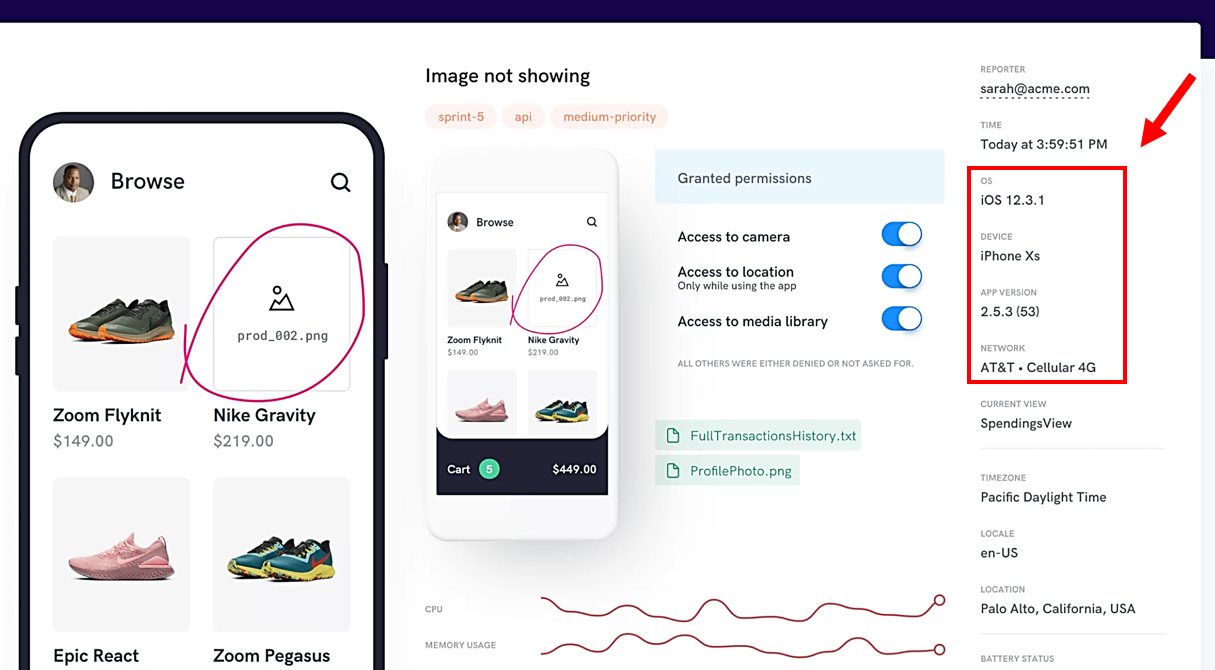
Shake will automatically attach a total of 71 data points, including permissions that the user granted to your app, such as access to the calendar, contact, photo gallery, location, or microphone.
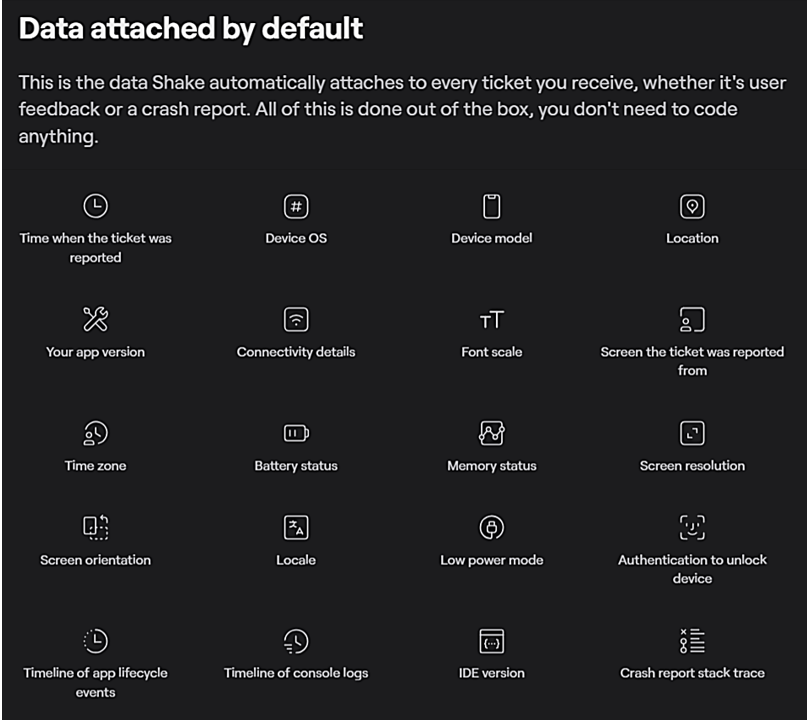
This info may be relevant when investigating the reported defect.
Of course, testers can also add their screenshot annotations, comments, and other elements of defect reports discussed later on in this article.
Finally, bug reporting tools like Shake are easily integrated with your other defect management tools, such as ClickUp, Jira, GitHub, Slack, and many more.
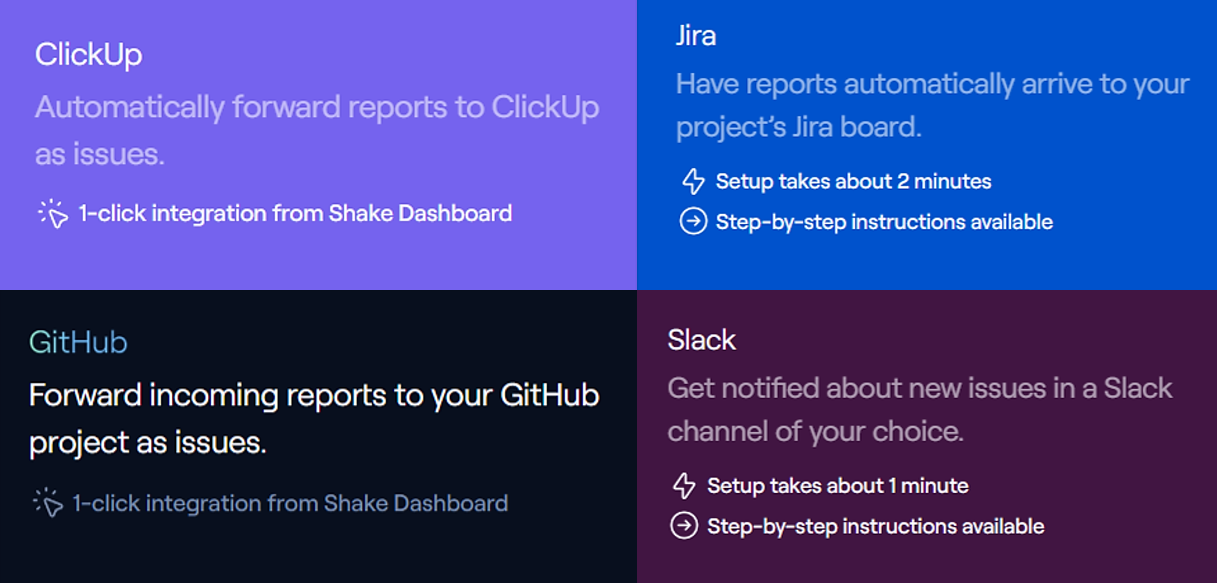
These integrations enable you to streamline the remainder of your defect management process that follows a report, i.e., defect categorization, assignment, and tracking until resolution and fix verification.
These examples nicely illustrate why it’s best practice to use an effective combination of defect management tools.
More precisely, leveraging the right tools can streamline the way your team identifies, reports, tracks, and resolves software defects, enabling faster and more efficient workflows.
Now, let’s see what else can improve your defect management reporting.
To make the process of defect resolution during software testing smoother, testers should provide a detailed description of each encountered defect.
This is going to include a defect identifier (ID) and title, a description of what the issue is, information about where and under which circumstances it occurs, as well as technical details (device, operating system, etc.).
A detailed defect description should allow developers to clearly understand what the problem is and enable team leaders to schedule the fix process accordingly.
Here are some usual test environments where a defect might occur—which should be indicated in the defect description—along with defect examples.
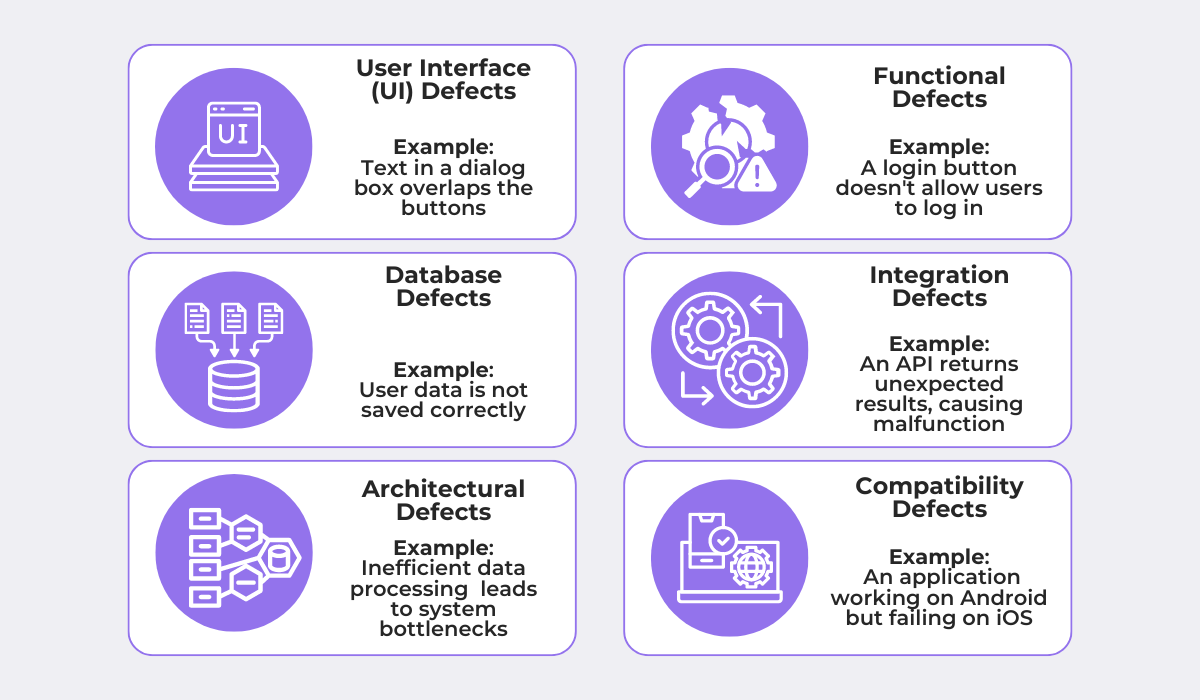
Let’s give a few examples for better clarity.
User interface (UI) defects refer to mostly cosmetic issues that impact user experience.
Such defects may include elements such as overlapping text, misaligned buttons, and incorrect color, font type, or size.
Functional defects, on the other hand, occur when software doesn’t perform as expected, manifesting as malfunctioning features (e.g., failed login).
Overall, your testers’ defect descriptions should include where the defect occurred, as this is one of the essential pieces of information needed for effective defect investigation and resolution.
As illustrated below, It’s also beneficial to include screenshots, logs, and any other relevant files to your defect descriptions.
This provides developers with visual evidence and additional context required to reproduce and resolve defects.
As discussed in the previous section, this process can be automated by bug reporting tools that record relevant defect data and attach it to your report by default.
In any case, detailed defect descriptions enable your developers to understand the issue thoroughly and empower your testing team to accurately categorize defects, which brings us to the next best practice.
When preparing bug reports, the categorization of defects based on their severity and priority is crucial for determining the order in which the dev team will address them.
As you know, a typical software development process has limited personnel and strict timelines.
Therefore, appropriately categorizing defects ensures these resources are not wasted on less important issues while more urgent matters await.
This defect categorization is also called defect triage.
For effective defect triage, it’s essential to establish clear definitions of defect severity and priority.
This will help the testing team understand how to categorize defects based on their impact and urgency.
To illustrate, here are definitions of defect severity ratings determined by the project team developing an app for Elexon, the UK’s electricity market operator.

As shown, the testing team will assign a severity rating for each defect based on these definitions, i.e. a defect’s impact on the application’s stability and user experience.
Concurrently, they also provide definitions for defect prioritization.
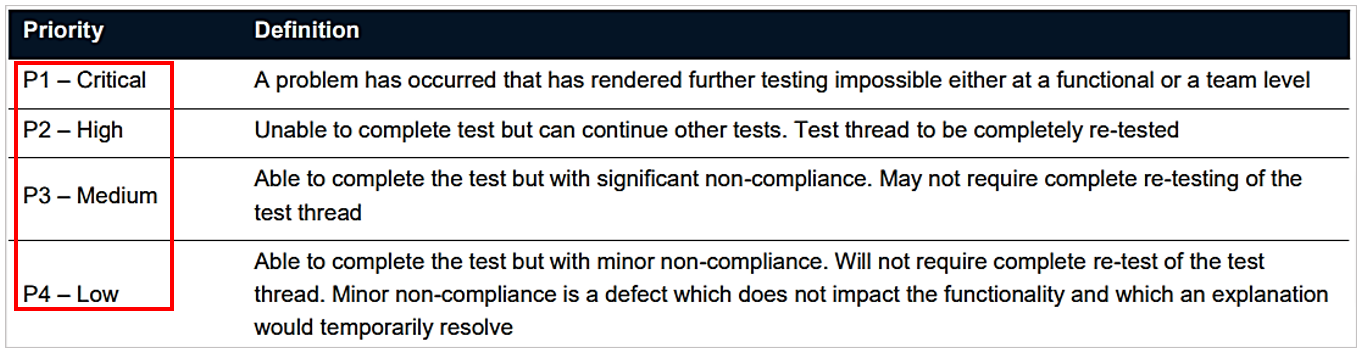
While these defect severity and priority levels adequately illustrate the concept, your definitions may differ depending on your project’s specific requirements, industry standards, and management priorities.
Although it may seem like high-severity defects should always be a high priority, that’s not necessarily the case.
For example, if an app crashes (high severity) because a user entered an unusually long text string into their username box, this issue may be given a lower priority than other defects that affect more users.
In other words, although it causes the app to crash, this too-many-characters defect is an extremely rare scenario that affects very few users, so it can be addressed later.
Conversely, any defects affecting your app’s data security expose your organization to potential cyberattacks and data leaks, so they fit the “high-severity = high-priority” principle.
Long story short, appropriate defect categorization according to the agreed (and regularly reviewed) definitions of severity and priority is vital for efficiently organizing defect resolution workflows.
Another thing that can make the task of defect resolution easier is explaining how your dev team can reproduce the defect.
After all, if developers don’t know how a defect exactly occurred, they’re left with the time-consuming, complex, and sometimes impossible task of trying different scenarios to reproduce it.
Moreover, if they can’t reproduce the reported defect, they can’t test whether their fix works.
This is confirmed by an experienced software development manager, Jim Bird.

His words underline the importance of testers and users outlining the steps to reproduce the defect in their reports.
Some would even say they’re the most important component of defect reports.
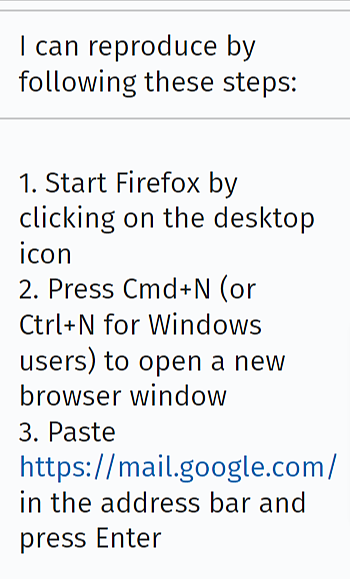
The description of these steps should consist of short sentences arranged according to the sequence of actions a tester/user has taken when they encountered the defect.
Here’s a web app example from a user not being able to access Gmail via Firefox.
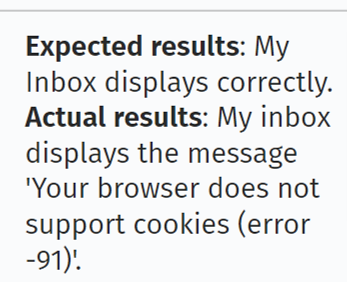
In addition to clear and concise step-by-step instructions, it’s also helpful to specify the expected result (what should normally happen) and the actual result (the defect).
Overall, explaining how defects can be reproduced and comparing the expected and actual results in defect reports is a vital best practice.
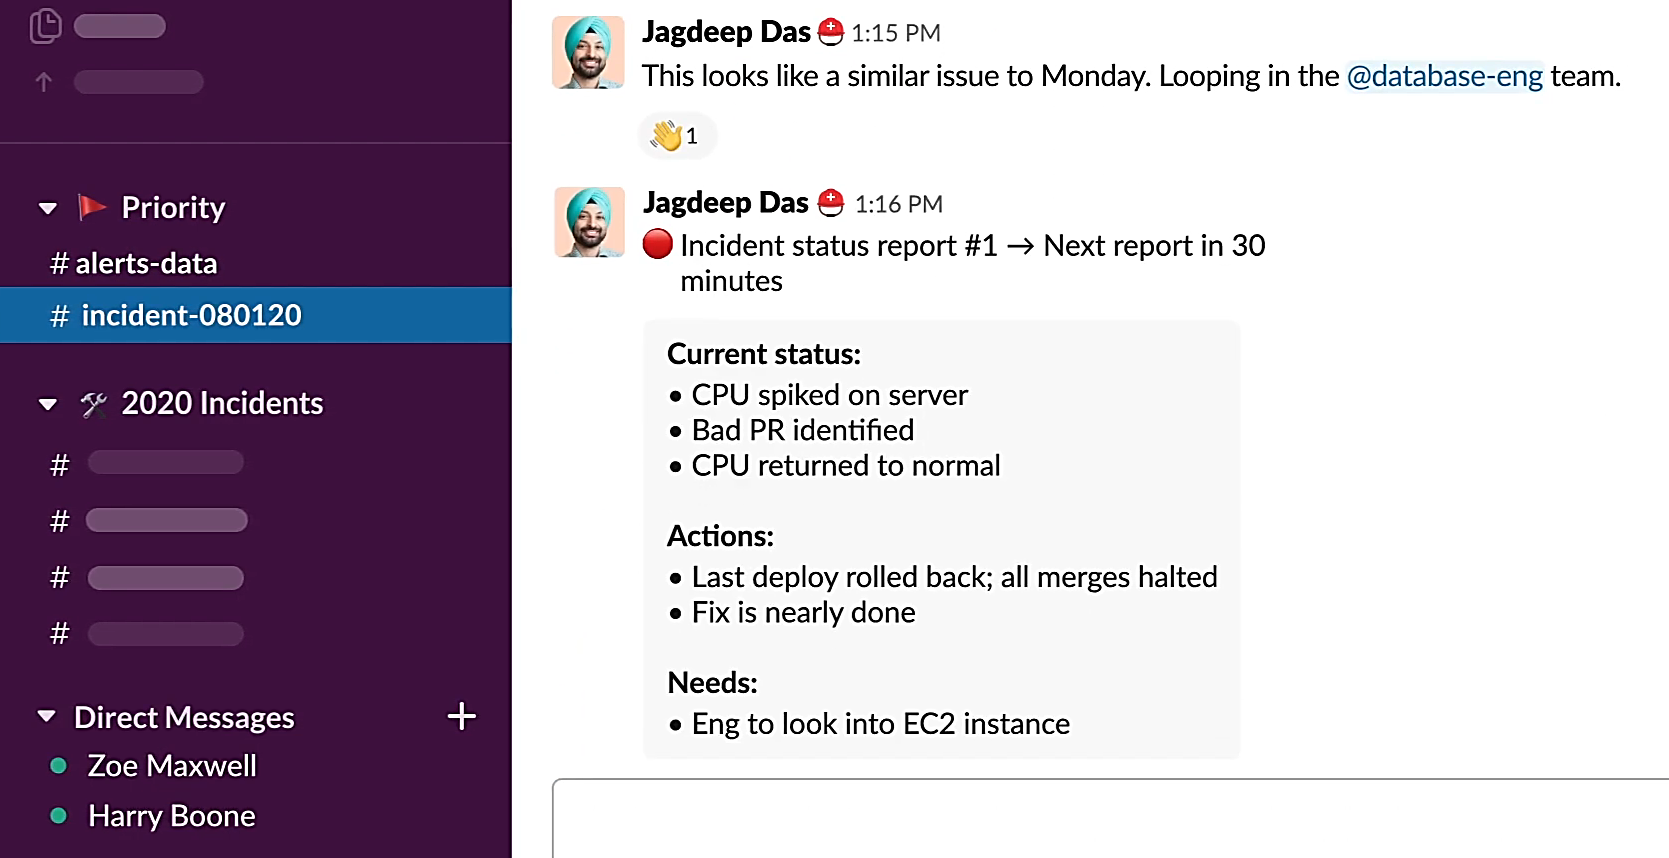
It should be noted that some defect-reporting tools can capture and replay user actions (taps, scrolls, etc.) taken before a problem occurred.
This functionality—session replay—allows developers to automatically replay the events that led to the defect.
In such cases, even when the steps to reproduce are unclear or don’t result in the reported issue, developers can watch a video-like replay of the relevant user session.
That way, they can see how the defect happened, reproduce it, find the root cause, resolve the issue, and check that the fix works.

Capture, Annotate & Share in Seconds with our Free Chrome Extension!
For successful defect management, defect reports need to be easily understood by all team members, and they all need to know exactly what is going on with a defect at any given moment.
To achieve this, you need to facilitate team communication by:
This starts by enabling team members to review the status of all reported defects in one place.
A good example of this is ClickUp’s Defects Master List.

Such centralized lists of all defects allow developers to more easily coordinate and collaborate on defect management.
Additionally, this helps avoid duplication of efforts and keeps developers accountable for their assigned defect resolution tasks.
Likewise, project managers and team leaders can, by leveraging the defect categorization we covered, more effectively allocate the available resources.
On that note, remember how ClickUp can be integrated with Shake so that the technical side of defect reporting is automated?
Well, the Shake dashboard gives your team another convenient place where they can get a centralized view of all reported tickets.
Another important aspect of defect management is day-to-day, synchronous or asynchronous, communication and collaboration between all project stakeholders.
Since team members are often scattered across multiple locations, a communication platform like Slack can be a powerful tool for streamlining clear defect management communication.
In short, Slack’s channels and threads allow team members to discuss and report on the progress of specific defects or groups of defects with full visibility.
Of course, Slack can enhance not only defect-related discussions but all communication in a software development project.
All in all, enabling developers and testing teams to effectively communicate using established procedures and tools can remove many obstacles to achieving fast and efficient defect resolution.
So, what conclusions can we draw from the best practices we outlined in this article?
Firstly, successful defect management reporting boils down to enabling your team to efficiently generate accurate and comprehensive defect reports that contain all the required elements, such as a detailed defect description and steps to reproduce.
Secondly, it involves establishing a robust defect management process to appropriately categorize defects by severity and priority, track their progress until resolution, and enable clear team communication.
These prerequisites can be either accomplished or facilitated by combining the right tools and methods that can streamline your entire defect management process.
Ultimately, this leads to simpler, faster, and more cost-efficient defect resolution workflows.
And isn’t that exactly what you’re trying to achieve?
From internal bug reporting to production and customer support, our all-in-one SDK gets you all the right clues to fix issues in your mobile app and website.
We love to think it makes CTOs life easier, QA tester’s reports better and dev’s coding faster. If you agree that user feedback is key – Shake is your door lock.
Read more about us here.

Add to app in minutes

Doesn’t affect app speed

GDPR & CCPA compliant

Unexpected things pop up
Just like bugs in your app or web 🐛 Fix them now with just one reporting tool.